
 English
  Français
And here we go for the fourth tutorial, dedicated to discovering Pygame in Python! 😃
For this new step, we will move our sprite! 😋
Before we dive head first into the code, let's think about what we want to do! 🙃
We want our ninja rabbit to be able to go right by pressing the right arrow, stop if we press more and go left if we press the left arrow. This means that we will have to test the keys on the keyboard to see which key is pressed and gradually move our man in one direction or the other. 🧐
We will also have to give it a certain speed (which we can change depending on the type of game we want to make 🤠).
And finally, you will have to display it, taking care to turn it around when it goes to the left (otherwise, it will do a Moonwalk like Michael...). 👻
Well, when you put it like that, it doesn't seem too complicated! (But, in fact, it's going to be a little bit complicated anyway...) 🤯
Okay, let's start with the simplest with the Constants.py file ! 🤪
File: Constants.py
# Created by Jay81, on 06/16/2024 in Python 3.7 """Game constants""" # Window settings WIDTH = 640 HEIGHT = 360 # Window customization TITLE = "Rabidja" ICON = "" # List of game images (graphics) BACKGROUND = "graphics/background.png" SPRITE_JOUEUR = "graphics/rabidja.png" # Player sprite size PLAYER_HEIGTH = 50 PLAYER_WIDTH = 40 # State machine NONE = 0 RIGHT = 1 LEFT = 2 IDLE = 0 WALK = 1 JUMP = 2 DOUBLEJUMP = 3 DEAD = 4 # Timer for animation TIMER = 4 # Player speed PLAYER_SPEED = 4 |
Not much to add here... Just a state: NONE when our player is immobile and the speed of our player: PLAYER_SPEED , which we will set to 4 for now (but which you can change at the end to test!) 😎
Now let's move on to Main() (main program).
File: Main.py
# Created by Jay81, on 06/16/2024 in Python 3.7 # Import from pygame import pygame from pygame.locals import * #Import game constants and classes from Constants import * from Player import * #Initializing pygame pygame.init() clock = pygame.time.Clock() # Open the game window in 640 x 360 pixel resolution window = pygame.display.set_mode((WIDTH, HEIGHT)) #, pygame.FULLSCREEN|SCALED) #Title pygame.display.set_caption(TITLE) #Loading the wallpaper (background) background = pygame.image.load(BACKGROUND).convert() #Player Creation player = Player() # Main game loop continues = True while continues : # We test the events |
And there you have it! Now, we will explain these changes step by step. 😄
First, I changed the window opening a bit, to be able to test the Fullscreen. So, if you remove the # comment from the next line, as well as a parenthesis after HEIGHT and launch the game, it will take up your entire screen! 😃 Magical, right? 🤩
# Open the game window in 640 x 360 pixel resolution window = pygame.display.set_mode((WIDTH, HEIGHT)) #, pygame.FULLSCREEN|SCALED) |
Now let's move on to keyboard management. This works the same way as with all libraries (and even more so with SDL... 😋). We create a variable dicKeys and call Pygame to record the keyboard key(s) pressed. We then do a series of tests (if / elif) to record in player.input whether our player should go RIGHT, LEFT or do nothing: NONE. In fact, it's pretty simple here. 😉
Note that if you press the ESCAPE key , you exit the game by interrupting its infinite loop. 🙂
# We test the presses on the Left / Right keys dicKeys = pygame.key.get_pressed() if dicKeys[K_LEFT]: player. input = LEFT elif dicKeys[K_RIGHT]: player. input = RIGHT elif dicKeys[K_ESCAPE]: continues = False |
And here we go, as usual, now let's move on to our last file! Here, where the biggest changes are! ☺️
So open Player.py and update the text below:
File: Player.py
# Created by Jay81, on 06/16/2024 in Python 3.7 # Import from pygame import pygame from pygame.locals import * #Import game constants and classes from Constants import * """Class to create a character""" class Player : def __init__ ( self ): # Loading the sprite file self.sprite = pygame.image.load(SPRITE_PLAYER).convert_alpha() # Sprite coordinates self.x = 0 self.y = HEIGHT - PLAYER_HEIGTH - 40 # Sprite Direction self.direction = RIGHT # Animation self.frame = 0 self.timer = TIMER self.state = IDLE self.maxframes = 7 # Keyboard input management self.input = NONE # Sprite update def update ( self ): # We manage the timer (countdown to scroll the animation) if self.timer < 0 : if self.frame < self.maxframes: self.frame += 1 else : self.frame = 0 self.timer = TIMER else : self.timer -= 1 # Keyboard input management if self.input == LEFT: if self.x > 5 : self.x -= PLAYER_SPEED self.state = WALK self.direction = LEFT elif self. input == RIGHT: if self.x < WIDTH - PLAYER_WIDTH: self.x += PLAYER_SPEED self.state = WALK self.direction = RIGHT else : self.state = IDLE self. input = NONE |
First, we're going to create our input variable and set it to NONE by default, because we want our character to start the level standing still (he's not going to leave without us, either! 😮).
Note that to manage the input variable, we must write Player.input when we are outside the class (for example in the Main()) and self.input when we are inside it. This is logical and it allows us to create, for example, two Player objects (for player 1 and 2) without them having the same values. 😁 But it's a little complicated for this tutorial (you can see this later on, in another tutorial) . 🧐
# Keyboard input management self.input = NONE |
Here we will manage the movement of our sprite. It's simple:
- If he goes left :
- We move it to the left by removing PLAYER_SPEED from its x abscissa EXCEPT if it is less than 4 pixels from the edge (otherwise it will go off the screen and we may never see it again... 😅)
- We put its state on WALK
- We put its direction on LEFT (all this will be useful to know how to draw it on the screen)
- If he goes right:
- We move it to the right by adding PLAYER_SPEED to its x abscissa EXCEPT if it is at the edge of the screen on the right (i.e. the WIDTH of the screen minus the WIDTH of the sprite if we don't want it to disappear... Try removing - PLAYER_WIDTH to see. You'll quickly understand! 😂)
- We set its state to WALK.
- We put its direction on the RIGHT.
- If he does nothing:
- We set its state to IDLE.
In any case, afterwards, we put input back to NONE, otherwise, the game will believe that the key remains pressed, even if we release it!!! 😱
# Keyboard input management if self.input == LEFT: if self.x > 5 : self.x -= PLAYER_SPEED self.state = WALK self.direction = LEFT elif self. input == RIGHT: if self.x < WIDTH - PLAYER_WIDTH: self.x += PLAYER_SPEED self.state = WALK self.direction = RIGHT else : self.state = IDLE self.input = NONE |
And there you have it, now let's move on to displaying the sprite! 😅
If we start with the blit of our character on the right, it is the simplest, because it is the same thing as in the previous tutorial (it is the else ).
Where it gets complicated is for the blit on the left because we have to flip our sprite sheet using a temporary variable spritecopy and calling Pygame which takes care of everything (pygame.transform.flip). Here, we set the first flag to True for a vertical flip, the second to False is for the horizontal flip . 😉
Now when we go right, our frames always go from 0 to 7 like in the previous tutorial.
But when we go left, our frames will go from 2 to 9 because we will have to flip our spritesheet and we will therefore start with two empty frames (if you don't pay attention, your sprite will flash like a Christmas tree! 😅).
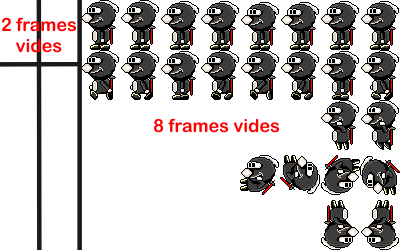
So we will have to add 2 to the frame variable when we go to the left, to have the right frame. 😉
# Depending on the direction, we orient the player by doing a flip to the left if self.direction == LEFT: spritecopy = pygame.transform.flip(self.sprite, True , False ) surface.blit(spritecopy, (self.x, self.y), |
Note that the call to spritecopy is not mandatory when going right , but it is always better to standardize the code, for the sake of simplicity 😉.
There you go! If you start the game by pressing the green arrow in the MAIN, you will now be able to move your favorite rabbit from right to left! Enjoy the game! 😅
See you soon for the rest! 😄